Friday, December 30, 2016

Kick Up Your Heels!

Happy *almost* New Year!!

Can you believe how quickly 2016 has flown by?

BUT before we ring in 2017... I'm sharing a card I made for the LDRS Creative blog today!

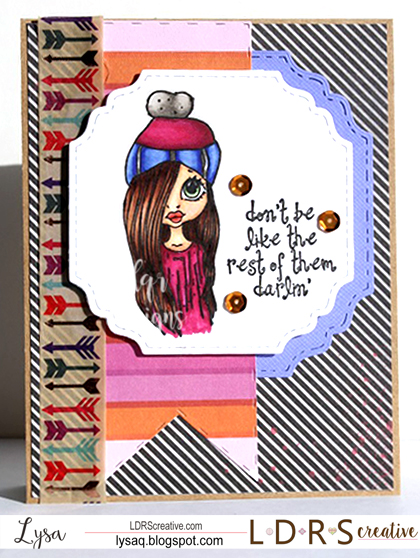
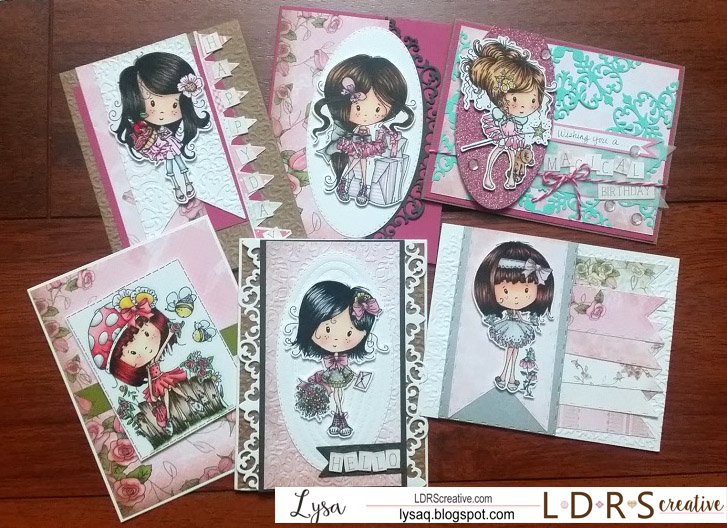
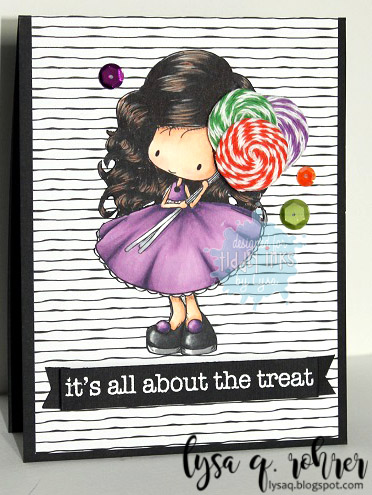
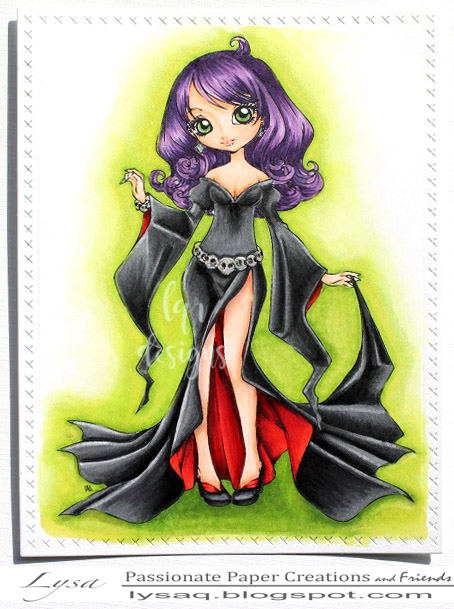
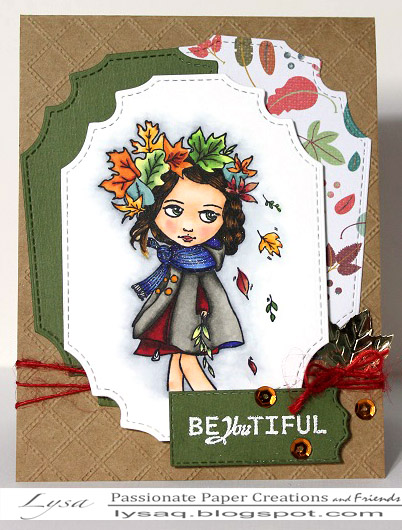
I decided this All Dressed Up: Love that Dress stamp, and sentiment from Uptown Sayings was a perfect match for a New Years card!

Kick Up Your Heels...

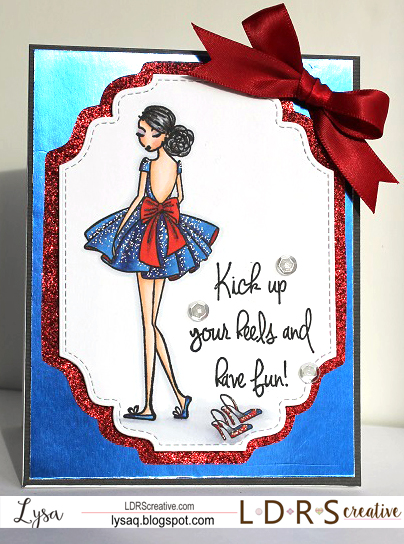
I colored with copics and die cut using the Fancy Rectangles & Layers die, adhered it to the red glitter paper and fussy cut out along the die cut since I had used the largest rectangle. Added sparkle to the dress and shoes with a glitter and white gel pen, finished off my card by adhering it to my card base with a coordinating blue foil card stock, and red bow!

Copics:
skin: E000, E00, E21, R20, BV00
hair: C3, 100
dress/shoes: B24, B26, B29, R17, R37, R46

Wishing you all a FABULOUS 2017... until next year!

Thursday, December 29, 2016

Penguin cuties

Hello Friends!

I'm over on the Passionate Paper Creations blog today sharing two cards I made with PPCF Facebook sponsor images by Conie Fong Art!

I'm a sucker for cute critters and in the winter that means sweet adorable penguins... I totally fell in LOVE with these two!

On this card, I used Joy to the World...

Joy Penguin

I colored the penguin with Copic markers and trimmed out the image (I accidentally printed him too close to some other images to use a diecut- oops!). I die cut layers of patterned papers using Creative Basics dies- Fancy Rectangles & Layers and Basic Stitched Flags. I also used the Picnic Quilt embossing folder for some texture on the blue cardstock layer.  Finally tied everything together with a red ribbon before attaching it to my card base.

Copics:
penguin: N3, N5, N7, N9, R01, Y32, Y35
hat/scarf: R17, R37, R46, C0, C1
joy: R14, R17, G02, G05, G07, B24, B26, Y17
snow: B0000, B41

For my second card I used another sweet penguin, Snowy Delivering Presents...

Snowy Delivery

I also colored him in copics, but decided to use a different gray color family than on my first penguin. I kept this card pretty simple since there was so much going on with the stack of presents. The sentiment is pieced together from a couple of Lawn Fawn sets, Baaah Humbug and Toboggan Together. I used the Basic Stitched Flags again and finished it off with the doily behind the flags.

Copics:
penguin: C3, C5, C7, C9, R01, Y32, Y35
hat: B24, B26, B29, C1, C3
mail/bag: E40, E41, G02, G05, G07
presents: B24, B26, BG11, BG13, BG15, G02, G05, G07,
R17, R37, R46, Y17, Y26, Y28

Thanks for stopping by! I'll be back tomorrow with one last card before 2017!

Saturday, December 24, 2016

Meowy Christmas!!

Popping in quick before the holiday festivities to say MERRY CHRISTMAS!!

IMG_3300

(or maybe is Meowy Christmas? LOL)

Wishing you and your families a wonderful holiday!

Friday, December 9, 2016

Christmas Tree Cutie

Happy Friday!!

Poppin' in quick today to share this Christmas Tree Cutie from Passionate Paper Creations & Friends FB group sponsor, Bloobel Digital Stamps!

I Believe

I finally had the itch to do some coloring last night, and was able to throw her up on a card with some coordinating patterned papers and die cuts from Creative Basics!

Copics
skin: E000, E00, E21, R20

eyes: B63, B66, B69
hair: 100, C3
dress: YG03, YG17, YG25, YG67
blue bulbs/gift: B12, B14, B16
red bulbs/ribbon: R17, R37, R46

Thanks for stopping by... Happy Weekend!

Wednesday, December 7, 2016

Happy 50th Rhea!

Yesterday was Rhea's (of Passionate Paper Creations, & the owner of the PPCF Facebook group) *50th* birthday!  There's a ton of games and giveaways happening in the facebook group too...

I created this card for her using a digital image created just for her by Power Poppy, Orchid Dreams.

Birthday Orchids

I colored using Copics in her fave colors- purple & teal.  I die cut the image using the Fancy Squares and Little Things die set and trimmed out the corner flower to hang out. Embossed the purple layer using the Picnic Quilt embossing folder, and added a Basic Stitched Flag as a base for the teal foam thicker number stickers.

Copics: 
orchids: BV01, BV11, BV13, BV17, V01, 
leaves: YG03, YG17, YG67, 
pot: BG13, BG15, BG18, E31, E34
book: E40, E41
glasses: V12, V15, V17

Hope you had a FABULOUS day Rhea!

Monday, December 5, 2016

Sweet Dreams Molly

Hello!

It's been a few days since my last post- since the holidays sneaking up on us my crafting has decided to take a bit of an (unplanned) vacation! :(

But I am popping in to share this card, I forgot to post last week... AND to remind you that you still have time to join the FROSTY FEELING challenge over on the Tiddly Inks Challenge blog!

Spoiled Rotten

This is the adorably new Sweet Dreams Molly digi image available from Tiddly Inks!  Love her in her cute onesie pajamas and that giant candy cane!

Will be back soon with more to share! Thanks for stopping by!

Wednesday, November 30, 2016

North Pole Woods

Hello!

Hope all of you in the US had a wonderful holiday weekend, and everyone else- a fabulous regular weekend! LOL!

I'm sharing a card today over on the LDRS Creative blog that I made combining two of the newest clear stamp sets- North Pole & North Woods!

North Pole Woods

I stamped and masked the polar bear from the North Pole stamp set and then added the trees to the background. Colored in copics, I gave the trees a dusting of snow- it is the North Pole, right? I die cut the scene using a die from the Fancy Squares & Little Things die set, and finished of the image with a bit of sparkle using a Spectrum Noir sparkle pen. I found some coordinating pine tree patterned paper in my stash, along with the polka dots (I thought looked like snowballs!) using the Basic Stitched flag die also from Creative Basics, pulled everything together with a sprinkling of snowflake sequins and baker's twine and added the sentiment using a stamp from the *HSN exclusive* CandiBean Christmas stamp bundle... there's still some available AND they're on sale!!

Copics: 
polar bear: C00, C0, C1, C3
trees: E35, E37, YG03, YG17, YG67, YG97

Thanks for stopping by hope you have a fabulous day!!

Saturday, November 19, 2016

Spreading Joy!

Hello! Happy Saturday!

I'm on the Passionate Paper Creations blog today sharing this adorable image from one of our sponsors, Conie Fong Art!  I am totally in love with all of her images and can't wait to get my hands on more!

For my card today, I colored up this sweet image, Holly Poinsettia...

Sending Joy

If you follow me on Instagram, you may have seen her a few days ago for the 30 Day Coloring Challenge hosted by Kathy Racoosin.  I just love these coloring challenges since it builds up my collection of colored images & makes the card making process go much quicker!

I die cut the image and the aqua mat, using Fancy Rectangles & Layers by Creative Basics. Stamped the sentiment (The Greeting Farm) and adhered all my mats and layers on to my card base with some coordinating patterned paper, and finished it off with some sparkle using glitter washi tape and sequins!

Copics:
hair: 100, C3
skin: E000, E00, E21, R01
clothing: BG02, BG05, BG07, R17, R37, R89, R81, R83, R85, Y32, Y35, Y38;
boots: C1, C3, C5;
poinsettia/pot: R17, R32, R43, R35, W1, W3

Thanks for stopping by! I hope to see you over in the Passionate Paper Creations Facebook Group!

Tuesday, November 15, 2016

Thermal Weather

Thermal Weather... but obviously not here, we're still pushing the *almost* 90 degree mark! (but still beautiful weather..I'll take it!)

I'm on the LDRS Creative blog today sharing a card I made using the new, Saturated Canary stamp- Thermal Weather!

Darlin'

I colored her with copics in some rich jewel tones and die cut it using the Fancy Squares and Little Things dies, including the purple mat. I used some coordinating patterned papers and washi tape in addition to a Basic Stitched flag- that is actually two flags adhered together behind the image to make it fit the length of my card. I finished my card by adding the sentiment from the Amazing Girls stamp set.

Copics:
skin: E000, E00, E21, R01;
eyes: G20, G21, G24;
hair: E23, E25, E27, E29;
clothing: RV17, RV19, RV66, RV69, B63, B66, B69, W1, W3, W5

Thanks for stopping by!!

Note of Thanks...

Happy Tiddly Inks Tuesday!

It's time for a new challenge, and this week's challenge is THANK YOU!

I created a very Clean & Simple style card this week using this adorable Wryn image, Big Wheels Keep on Turnin'

Note of Thanks

I colored her with copics and kept it super simple with the sentiment and some faux stitching.

Copics: 
skin: E000, E00, E21, R01
hair: E29, E35, E37, E39
clothes: R17, R37, R89, C1, C3, C5
flowers: Y13, Y15, Y17, Y17
basket: E53, E55, E57
bike: Y13, Y15, Y17, W1, W3

Hope to see you join in the fun- check out all the details on the Tiddly Inks Challenge Blog!

Thanks for stopping by!

Friday, November 4, 2016

"Deer" friend

Woohoo! Happy Friday!

Starting off this first weekend of November with Passionate Paper Creations & Friends Facebook group's last sponsored weekend of the year with Little Miss Muffet Stamps!

There are some ADORABLE new reindeer digis in the shop and they are the cutest- I want them all!

I colored up Reindeer Greetings first...

Deer Friend

After coloring with copics, I die cut the reindeer using a Fancy Rectangles and Layers die by Creative Basics, in addition to another of the same size in green card stock.  I love keeping my cards simple so I just layered them onto a piece of patterned paper and added some wood veneer and sequin embellishments.

Copics: 
reindeer: B24, B26, C0, C1, E31, E33, E35, E37,
red: R17, R37, R89
greens: YG03, YG17, YG67
shadow: B41, 0

Thanks for stopping by! Have a wonderful weekend!

Tuesday, November 1, 2016

Ka-POW!

Happy NOVEMBER!

I can hardly believe that it's already November! This year has just flown by...

But it's also Tuesday... which means it's time for the next Tiddly Inks Challenge. This week's challenge is to channel your super powers and bring out those superheros and masked avengers- KAPOW!

KaPOW

I used the SUPER cute, My Super Boy image and colored him with copics in colors that my son chose :). Adhered him to the diecut the green circle with foam tape and lined up the sentiments (from My Favorite Things) around him, added a shiny metallic blue mat and mounted it all on my card base.

Copics: 
skin: E000, E00, E21, R01
hair: E44, E47, E49
clothes: B23, B24, B26, R17, R37, R89, Y13, Y15, Y17; YG03, YG17, YG67. W3, W5, W7

I hope you have a SUPER day!

Monday, October 31, 2016

Happy Halloween!!

I'm on the LDRS Creative blog today sharing my LAST Halloween card... this year! Ha!

It's funny because I didn't get into Halloween cards until recently, and now with all the images getting cuter and cuter every year- it's hard to resist!

I decided to play with one of the new Dollhouse images, Oh Deer and transform her into a Halloween-themed image! When looking for ideas for my own costume this year- I kept seeing a trend photos of deer face paint/make up ideas, and photos from all the new "selfie" photo apps that are out now and found my inspiration!

Oh Deer

I colored her with copics and added the bit of brown down the front of her forehead and nose to look like a deer as much as I could! I die cut the stamped image using the Fancy Squares & Little Things die, and also a larger mat from the same die set in purple card stock. Using some coordinating Halloween-themed patterned papers I matted the die cuts to my card base and added a few Basic Stitched Flag dies, the black glitter and spider print strips are washi tape, stamped my sentiment from the Friendly Greetings set, and finished it off with some large gems- what's Halloween without some sparkle, right?

Copics:
skin: E000, E00, E21, E31, E33, R20
hair: 100, C3
antlers: E31, E33
top/scarf: V04, V06, V09, YG03, YG17, YG67

Thanks for stopping by- have a fabulous and SAFE Halloween!

Sunday, October 30, 2016

Boo!

I'm on the Passionate Paper Creations blog today sharing *another* Halloween card!

I just about fell out of my chair when I saw this cute dragon by Conie Fong Art! If you didn't know I'm a total sucker for dragons, and Conie's line of dragons are super cute (as are the rest of her digital images!)

Boo Dragon

I colored Tori using copics, stamped the letters "BOO" in the balloons, and die cut the image using the Basic Stitched Flags die. I also cut out 2 more flags using the same size die in some coordinating patterns adhered it to my orange card base (with a square black card stock already layered on it). I added the die cut with the image on top using foam tape, topped the balloons with glossy accents and sprinkled a few coordinating sequins to finish it off!

Copics:
dragon: Y02, YG01, YG03, YG17, YG67, R20, V04
balloons: W1, W3, W5, G02, G05, G07, V04, V06, V09; YR02, YR04, YR07.


Thanks for stopping by... I have ONE more Halloween card coming tomorrow!

Saturday, October 29, 2016

Happy Haunting!

Hello!

Sorry it's been a few days since my last post... last minute preparations for Halloween going on around here- including a last minute decision to put together some costumes for my husband & me since we're headed to a party with friends (& kids) this weekend- we'd be bums if we didn't have a costume!

Anyway, I'm popping in to share another Halloween card- I'm squeezing in as many as I can before I switch over to Christmas/holiday cards! For today's card, I colored up another one of my Tiddly Inks favorites- PeekaBoo Bugg! She's just the cutest and one that I can never get tired of coloring!

Happy Haunting

Pretty simple card, colored and matched up with some coordinating Halloween patterned papers, & sentiment.

Copics: 
skin: E000, E00, E21, R01
hair: G24, G28, YG03, YG17
clothes/hat: V12, V15, V17, YR14, YR16
pumpkin: YR12, YR14, YR16, YR18, E55, E57, YG03, YG17, YG67

Hope you all have a wonderful and safe Halloween weekend!

Friday, October 21, 2016

Trick or Treat!

Happy Friday!

It seems like the number of Halloween cards I make each year increases! So many cute images & not enough time to play with them all!

Today, I'm sharing a card I made with this sweet skeleton from The Greeting Farm! And I'm in time for the Farm Fresh SPOOKY challenge! (I missed entering last month's challenge by a few hours! LOL)

Trick or Treat

Halloween time is getting so much more fun around here now that my kids are getting older and more into dressing up (well, at lease one of them!)

I colored Skeleton Ian with copics, and fussy cut him out,  die cut card stock and patterned paper using the Basic Pierced Ovals and Basic Stitched Flags by Creative Basics, added some coordinating patterned papers and washi tape, embossed the oval die and card base using a spiderweb embossing folder by Sizzix/Tim Holtz, and adhered Skeleton Ian with foam tape.

Copics
skin: E000, E00, E21
hair: E44, E47, E49, YR24
costume: C1, C3, N3, N5, N7

AND The Greeting Farm is sponsoring the weekend fun over at the Passionate Paper Creations & Friends Facebook group- come join the fun and your chance to win a $25 gift certificate!

Thanks for stopping by!

Wednesday, October 19, 2016

Hi-yah... Art Ninja!

Happy "hump" day.. the weekend is almost here!

Thanks to the Passionate Paper Creations & Friends Facebook group, I'm sharing another 'new to me' digital image company, Bloobel... they're definitely a little on the quirky side, but oh so fun! AND there's a fun sale going on this week (until Oct. 21!) BUT you'll have to be sure to join the PPCF group to get the promo code!

I love this little Art Ninja and his choice of weapon...

Color my World

I fussy cut this cute ninja after coloring him with copics, I used a Fancy Squares (& little Things) die from Creative Basics and added the sentiment from Lawn Fawn. Finally using some of my hoarded *ahem* collection of washi tape- I stuck them done to look like they were stripes of color that the little ninja painted! I adhered everything together and added the ninja with some foam tape, and added some glossy accents to the blobs of paint on his clothing. Finished it off by adding a couple of rainbow "enamel dots" (aka melted perler beads!) for more paint splatters!

Copics: 
skin: E000, E00, E11, E21
hair, E25, E29
clothes: W3, W5, W7
paint: R17, R37, R89, YR04, YR07, YR09, Y13, Y15, Y17, G02, G05, G07, B12, B14, B16, V12, V15, V17
paintbrush: B12, B14, B16, E55, E57, Y17, Y26, Y28

Thanks for stopping by! I hope you take advantage of the sale, and check out some Bloobel images for yourself!

Tuesday, October 18, 2016

Flying by to say...

BOO!

There's a new Tiddly Inks Challenge going on and it's SPOOKALICIOUS!

I used this new witch Molly image (that you can get as a two-some, with another Halloween Molly- I used her here!)

Flying By to say... BOO!

My finished card is TOTALLY not what I originally had in mind when I started coloring her, I had a big ink blob fall right next to her foot! So I fussy cut her out and layered her with some Halloween themed patterned paper, die cut tags- the purple tag I embossed using a Tim Holtz/Sizzix embossing folder, and adhered Molly using some foam tape. The sentiment is two stamps from a Hero Arts Halloween sentiment set (doesn't look like it's available anymore), I cut the words apart after I stamped them, inked up the edges a bit so it wasn't so white compared to the rest of the card, and adhered those on top of some random strips of glittery black washi tape.

Copics: 
skin: G20, G21, G24
hair: E44. E47, E49, V04
dress/hat: N3, N5, N7, V04, V06, V09

I hope to see you join in on the SPOOKALICIOUS challenge! Thanks for stopping by!!

Monday, October 17, 2016

Everyday Winnie

Hello!

I'm on the LDRS Creative blog today sharing a more detail look at some of the cards I made as samples for the HSN show that aired a few weeks ago.

LDRS Creative on HSN

This kit, Everyday Winnie by Polkadoodles,  includes 6 adorable stamps and a 6x6 pad of patterned papers all in a sturdy and coordinating storage box!

My first card is with Winnie's Scrummy Cupcake...

WInnie's Cupcake
After coloring Winnie, I used the Gilded embossing folder for my card base, added some of the patterned papers from the kit- including the banner flag and letters, paired it with a solid coordinating pink card stock mat, I used the Gilded Doily die as an embossing tool, (by running it through my diecut machine using an embossing mat)  on the Basic Stitched Flag banner behind Winnie, she is mounted using foam adhesive for some extra dimension.

Copics
skin: E000, E53, BV00, R20
hair: YR23, C3, 100
clothes: RV0000, RV00, RV02, B91, B93, B95
cupcake/flower: R17, R37, R59, R21, R22, R24, Y21, Y23, RV00, RV02, RV04.

My second card is with Winnie's Rose Garden. She is another favorite because I LOVE roses, and when I looked at her she made me think of Strawberry Shortcake... so that's how I colored her!
Winnie's Rose Garden

I decided to keep this card simple to allow Winnie to take all the focus. I colored her with copics, and kept my layers easy with just a single sheet of the gorgeous rose patterned paper from the kit. I added a few die cut flags to tie in a little more green from the leaves in the image and the paper together. Finished off the image pieces with some faux stitching with a black pen to match the stitching on the stitched flags.

Copics used:
skin: E00, E11, E50, R20
hair: R24, R27, E09, E18
clothing: R20, R21, R22, R24, C1, C3, Y11, Y13, Y15, Y17
scenery: E41, E43, E44, R81, R83, R85, Y11, Y15, N0, N3, N5, R01.

I hope you grab one of these fabulous kits for yourself... there's also 2 other holiday themed sets still available on HSN too- Holiday Winnie and Candi Bean Merry Christmas!

Thanks for stopping by!!

Friday, October 14, 2016

All About the Treat!

Happy Friday!!

Popping with a quick share using one of Tiddly Inks' newer Molly images...

Molly's Treat! 

Molly's Treat

Love her oversized lollipops... and thought they would be fun to make with some bakers twine.  With Halloween creeping up soon, I picked some fun coordinating colors. Kept my card super simple and adhered her to some stripey patterned paper and added the matching sentiment!

Copics: 
skin: E000, E00, E11, E21, R01
hair: C3, 100, YR24
dress: V12, V15, V17
shoes; N3, N5, N7

Thanks for stopping by.. have a FABULOUS weekend!

Wednesday, October 12, 2016

Toil & Trouble!

Hello!

Are you all prepped and ready for Halloween yet? I'm *almost* there, I have about 90% of my son's costume together- and about half of my daughter's!

Anyway, with the help (enabling) of the Passionate Paper Creations & Friends Facebook group, I've discovered a new digital stamp company, Conie Fong Art! Her images are all so sweet and cute.. I want them all!

Since Halloween is right around the corner, I thought I'd start with these cute bats... Yes, I said cute bats!

Toil & Trouble

See? Aren't they cute?!  After coloring them with copics I die cut the image using a Creative Basics die, Fancy Squares and Little Things, paired with with some coordinating Halloween-y patterned papers and also used a Basic Stitched Flags die (also Creative Basics). The "Toil & Trouble" are also dies that I found at Michaels, they're made by Sizzix/Tim Holtz. I finished off my card with silver thread and some batty buttons!

Copics: 
bats (left) C3, C5, C7, C9; (right) W3, W5, W7, W9; R20
pumpkin: YR12, YR14, YR16, Y38
branch: E55, E57, E74, E77, YG17, G94, G99
sky: B21, B23, B24, B26, B29

Conie Fong Art is also running a special sale just for members of the PPCF Facebook group- 25% off your entire purchase through October 15th! Check out the Facebook group for all the details and the promo code!

Saturday, October 8, 2016

Enchanting Esmeralda

Hello!

It's another fun sponsored weekend over at the Passionate Paper Creations & Friends Facebook group! This week it's Make it Crafty!!

They're a fairly new to me company- but I love so many of their images! Since Halloween is just around the corner, I thought I'd use this spectacular witch, Esmeralda!

Esmeralda

I had so much fun coloring her.. but I was so intimidated by those folds of her dress, but lucky for me (and you!) Zoe at Make it Crafty has a video tutorial showing how she colored Esmeralda!

I have added this image to a card yet- but I wanted to share it with you anyway, I'll edit this post to add it when I do ;)

Copics:
skin: E000, E00, E11, E21, R01
hair: V12, V15, V17, V09
dress: N3, N5, N7, N9, R14, R17, R29, E29
background YG0000, YG00, YG01, YG03, YG17, YG25, 0

Thanks for stopping by... don't forget to check out all the fun and happenings over on the Passionate Paper Creations & Friends Facebook group- there are prizes and a sales all weekend long!

Wednesday, October 5, 2016

LDRS Creative & HSN!

Hi Everyone..

Just a quick post here to share what I was up to through the month of September...

LDRS Creative has release special limited edition stamp kits ONLY available through HSN.com!!

I was crazy busy working to put all projects together to air on the show as samples.. I'll be sharing each one individually soon.. but until then- here's an overall look at all the projects I made

Candi Bean Christmas Critters:


PolkaDoodles Holiday Winnie-Gingerbread Joy:


and this one isn't holiday themed but still SUPER cute!

PolkaDoodles Winnie Sugar Blossom:


GO.. RUN... check them out before they're gone!


Tuesday, October 4, 2016

Pumpkin Patch Molly

It's FINALLY feeling a little more like fall around here, and by that I mean it's under 100*F!

Awesome timing for the newest challenge over at the Tiddly Inks Challenge... Happy Fall Y'all!

I used the a NEW sweet Molly image, Pumpkin Patch Molly (She's available with another sweet Halloween Molly image too!)

Pumpkin Molly

Isn't she the cutest?! I kept my card nice and simple with just coloring her and die cutting the image using a Mama Elephant Sew Fancy dies- love that it cuts and pierces the stitching all in one! I added the sentiment from Lawn Fawn's Happy Harvest stamp set, adhered it using craft foam to some coordinating- fall-ish plaid paper, added a bow & some sequins to pull it all together!

Copics:
skin: E000, E00, E11, E21, R20
hair: C3, 100
pumpkin: YR12, YR14, YR16, YR18, YG17, YG15, YG67
ground: E31, E33, E35
sky/shadow: B000, B00, B01, 0

Hope to see you join in on the fall fun! Check out the details on the Tiddly Inks Challenge Blog!!


Monday, October 3, 2016

Birthday {Hedge} Hugs!

I really wanted to participate in the 'World Card Making Day' fun over the weekeend, but timing just didn't work out for me! (Boo!)  But I WAS able to put together this card using some images I had stamped and colored a few days ago...

Worked especially well when I saw the latest My Favorite Things Card Challenges sketch!

#300!


Here is my take on the sketch...

Birthday Hugs


I used two of *my* favorite things to color at the moment... hedgehogs and succulents/cacti! I thought it would be cute to pair up this cute hedgie with a spiny cactus.

I stamped the little hedgehog and masked him off to stamp the cactus "behind" him, colored with copics, and die cut my scene and mounted on a slightly larger circle in kraft using craft foam. I created my sentiment by using 2 separate stamps from each set, added another cactus to the edge of the sentiment to anchor it so it didn't appear to just float there, and finally adhered the whole piece onto my card base that I stamped using the woodgrain background, added a few of my "DIY" enamel dots and called it done!

Copics: 
hedgehog: E40, E41, E43, E70, E74, E77, E79, R20
cacti: YG03, YG17, YG25, Y02, Y11, RV00, R22, R32, R35; (barrel cactus) YG17, YG21, YG25, Y32, Y35, Y38.

Thanks for stopping by... I have some fun things to share later this week- stay tuned!


Friday, September 30, 2016

Friendship Perks

Helllooo....

Second post today (whew! It's been a busy week!), but I'm back again to share my final card for the Coffee Lovers Blog Hop!

I'm also combining it with The Greeting Farm September Farm Fresh Challenge to use office supplies! I picked up this sweet Mini Remix-Brewtiful set, and just knew I had to do *something* with it! (Edited: and in the time it's taken me to write this post.. I missed the deadline! D'oh!)

Friendship Perks

Using some elements from different stamp sets, I think I pulled off the office supply theme! Colored mini Anya & Ian in copics, fussy cut them and mounted them with foam tape onto the diecut circle, found some coordinating patterned papers and used the coffee cup embossing folder for my background.  I used Schoolhouse Backdrops from Lawn Fawn to create the sentiment strip background, and the sentiment itself is from My Favorite Things' Stay Cool. I had to dig out my notebook edge punch to finish the strip & I added a clip I had in my stash of random embellshments (I think this one was from Stampin' Up).

Copics: 
hair: (Anya) C3, 100; (Ian) E23, E25, E27, E29
clothes: (Anya) B12, B14, B16; (Ian) R17, R37, R89, B34, B37, B39
coffee cups: (Anya) R17, R37, R39; (Ian) C1, C3, E31 E33, G05. 

Happy Friday and enjoy the weekend!!

North Pole Greetings!

Hello Happy Friday!!

I'm on the LDRS Creative blog today sharing yet ANOTHER card using the sweet penguin from the North Pole stamp set- I just can't get enough of him... I haven't even inked that adorable polar bear yet!

North Pole Greetings

I stamped & masked the Santa hat on the penguin, colored it in my favorite Copic red combo (R17, R37, R89) and gave the penguin a few strokes of gray to his belly for dimension and some rosy cheeks, and fussy cut him out. I also stamped the sign from the set, added the north pole sentiment, and die cut it with the matching die.
To give my card some texture, I die cut 2 squares using Fancy Square die in felt, with one of those squares I die cut again a little hill using one of the Basic Cutting Edge border dies- tucked the north pole sign behind it and the penguin on top.
The Merry Christmas sentiment is from a special set that will be available *only* on HSN starting October 5th! Stay tuned for more info on that...
To put my card together- I layered my felt scene with a Basic Stitched flag die cut and adhered everything to my card base, with this fun festive patterned paper (from Hobby Lobby).
Thanks for stopping by... I'll be back shortly with another share! :) 

Thursday, September 29, 2016

You're BREW-tiful!

2nd post today... I just had to get another card in for the Coffee Lovers Blog hop! How could I not with it being National Coffee Day??

This time I used one of the newer Molly images from Tiddly Inks, Molly's Cup of Love!

Brew-tiful

I just love her giant mug of sparkly hearts! I colored her in some warm fall colors (& I think I found a new favorite orange combination!) I love keeping cards with these Tiddly Inks girls clean and simple so they get all the focus... I added a sentiment from The Greeting Farm's Mini-Remix Brewtiful stamp set. Completed my card with some Spectrum Noir sparkle pen and a border of faux stitching.

Copics:
skin: E000, E00, E11, E21, R01
hair: E31, E33, E35, E37, E29
dress/headband: YR04, YR07, E09, E18
mug: B34, B37, B39; hearts: YG63, YR04, BG72; R37

Thanks for stopping by! I'm off to enjoy my coffee!

Chilly Daze

Hello!  I'm over on the Passionate Paper Creations blog today sharing yet another stamp from the new LDRS Creative release... I'm having so much fun with these stamps & dies!

For my card today, I used Chilly Daze, just love her wreath of fall leaves on her head...

BeYOUtiful

I colored her with Copic markers, die cut the image using the Fancy Rectangle and Layers die set. I also die cut some coordinating papers using the same size die and matted them off center for more interest against the (Picnic Quilt) embossed background. The sentiment is from the Summer Fun and die cut from a tag in the same rectangle die set. I found the leaf sequin in my stash and added a few more for some extra sparkle! 

Copics
skin: E000, E00, E11, E21, R20
eyes: G21, G24
hair: E44, E47, E49, YR23
clothes: B24, B26, B29, R46, R59, R89, W1, W3, W5; (shimmer on scarf- Spectrum Noir sparkle clear pen.) 
leaves: BG72. BG75, G94, G99, R39, Y02, Y15, Y17, YG03, YG17, YR14, YR16
background; C0, C1, C3, 0

Thanks so much for stopping by.. be back soon with more to share! 

Tuesday, September 27, 2016

Day 2 LDRS Creative Release

Hello!

I'm back again to share another card I created for day 2 of the LDRS Creative release!

Today, I used the North Pole stamp set along with Creative Basics dies. Check out all the new *stamps* and *dies*...

Penguin Joy

I used the sweet little penguin from the set, stamped it twice and added some eyelashes to make one a girl penguin ;)!

This stamp set also comes with the matching die set, which I also used to die cut the penguin couple... I lined up the die with the first penguin and taped it down, ran it through my Big Shot- by placing it to the edge of the cutting plates so the point where the penguin wings met hangs off the edge and doesn't get cut, then did the same thing for the other penguin, and carefully using my x-acto blade finished off the cuts.  I gave them a few strokes of gray copic around their bellies and some rosy cheeks. I die cut a few Basic Pierced Ovals and layered them to look like snowy hills and die cut them all together using the Fancy Rectangles & Layers die, mounted it on some coordinating patterned paper and washi tape background, added some bakers twine a few sparkly accents and called it done!

Copics: 
bellies: C00, C1, C3, 0
cheeks: R00

Don't forget to go to the LDRS Creative blog for more fabulous inspiration and chances to win! AND for even more chances to win- check out the Passionate Paper Creations & Friends Facebook group!

There's even a sale going on... 20% off the ENTIRE SHOP... this week only!!

Monday, September 26, 2016

LDRS Creative *NEW* Release!

Hello!

Super excited to share today... there's a NEW release happening over at LDRS Creative! There are NINE new products and everything is available in the shop right now!!


For my first card (come back tomorrow to see more!) I used this adorable Nesting stamp.

Nesting

After coloring with copics, I fussy cut her out, die cut a few Basic Stitched Flags, and used the NEW Peaceful Dove Edge die as an embosser to create my background (I added a few strokes of copic to make it stand out a bit more).  The sentiment is also from a new Christmas stamp set to be released soon- They're going to be featured on the Home Shopping Network on October 5th, and *only* available there... stay tuned for more details!

Copics:
skin: E000, E00, E11, E21, R20
hair: C3, 100
nest/birds: E53, E55, E57, YG17; B05, G05, B37; R37
scarf/sweater: R46, R59, R89, Y17, Y26, Y28; W3, W5, W7

Be sure to head over the LDRS Creative blog, and leave a comment for your chance to win a $25 gift certificate to the shop and to see some seriously awesome inspiration from the rest of my teammates!

AND we're also celebrating the release over on the Passionate Paper Creations & Friends Facebook group- so be sure to join (if you're not already a member) and play along! I hear there are more prizes to be won there too!

Thanks for stopping by!

Sunday, September 25, 2016

Coffee & Donuts

I'm back again with my second & last (sniff sniff) post as a guest designer over at Butterfly Reflections, Ink!

I decided with the Coffee Lovers Blog hop going on- I thought it would be appropriate to make another coffee card ;)  (& since Butterfly Reflections, Ink is one of the many sponsors for the hop!)

On to my card...

I used the sweet Big Bold Brew & Say Yes to Donuts stamp sets from Neat & Tangled... I had been eyeing them forever and finally got my hands on them!

Coffee & Donuts

I colored them with my trusty copics, fussy cut them out, added some foam tape and stuck them on some white cardstock and fussy cut them out again for some extra dimension. I dug through my stash of patterned papers and found these fall-ish colors and arranged them randomly to fit in the bottom corner. Added the cute coffee & donuts kids, the sweet sentiment, stickles for the rainbow donut sprinkles, and finished it off with faux white stitching to tie everything together.

Copics: 
skin: E000, E00, E21, R01
hair (boy): E44, E47, E49; (girl): E25, E27, E29
mug: B02, B12, B14, B16
coffee: E70, E74, E77
pants: W3, W5
shoes: N5. N7
donut: E31, E33, E35; R81, R83, R85
bow/pants: R17, R37, R89

Big thanks again to Vanessa and the Butterfly Reflections, Ink crew for having me apart of the team this month!  Hope to join them again sometime... Thanks for spending a bit of your Sunday with me!

Saturday, September 24, 2016

Scarecrow Coffee

Happy Saturday!

It's that time of year again... time for another Coffee Lovers Blog Hop!


The first day of Fall rolled around a few days ago, and it actually feels like it around here... (aka it's no longer 100*F degrees!)

I got this idea in my head and couldn't let it go til I had it down on a card...

Scarecrow Coffee

I mean... scarecrows need coffee too, right? All that hard work they do guarding the crops and you have to think that they're big pumpkin spice latte fans!

I pulled out this adorable Happy Harvest stamp set and went to town stamping the background with pumpkins- at first I was going to leave them as is in the Versamark ink, but I added a few swipes of copics to add more interest.  Mr. Scarecrow just had to have a big coffee cup and the one from the Love You a Latte set was a perfect fit! After masking the scarecrow, I stamped (& double stamped) a few stalks of corn using the Hero Arts green Ombre ink, die cut it using the Stitched Circle tags, and added a couple of pumpkins to finish off my little fall scene.

Hoping to get a few more cards in for the hop this week!

Copics:
scarecrow face: E13, E31, E35, R20, Y32
clothes: B91, B93, B95, BG13, BG72, BG75
hat: E31, E34, E35; BG13, BG72, BG75
straw: E31, Y35, Y38
pumpkins: YR12, YR14, YR16, YG63, YG67
coffee cup: C1, C3, E40, E41, YR12, YR14

Thanks (a latte) for stopping by! Have a fabulous weekend!

Tuesday, September 20, 2016

Mermaid to be...

Yes... I'm back with *another* mermaid card... are you tired of them yet? Yeah- me either! LOL- there's just so many fabulous little mermaids out there, I can't get enough of them!

I'm sharing today a card I made for the newest ANYTHING GOES challenge over on the Tiddly Inks Challenge blog!

I used this awesome Wryn the Mermaid digi...

Mermaid to be..

I kept my card simple to let her shine as the focus on the card. I blended some blues and aqua distress inks onto an embossed background and adhered her with foam tape. Added a sweet sentiment from The Greeting Farm onto a flag die by Creative Basics.

Copics: 
skin: E000, E00, E21, R20
hair: RV14, RV17, RV19
top: V12, V15
tail: B02, B05, G05, B37
stars: Y13, Y15, Y17

Hope to see you join in the Tiddly Inks fun! Check out the Challenge Blog for all the details- and more awesome inspiration from the rest of my Tiddly teammates!

Thanks for stopping by!

Saturday, September 17, 2016

You Are My Sunshine

Hello!

We're having some fun over on the Passionate Paper Creations & Friends Facebook page this weekend- Power Poppy is sponsoring a coloring contest, having a sale, and prizes!


For my card, I used the Sunshine of my Life digi... I just LOVE sunflowers, they scream fall to me (and well summer too, since that's when we have them growing in our garden)!

Sunshine of my Life

I die cut the sunflower image using the Fancy Rectangles & Layers die- luckily I sized my image just right! :) The sentiment that comes with the image is cut from a Basic Stitched Flag die. Mounted all of that onto an embossed card base using the Picnic Quilt embossing folder- EVERYTHING by Creative Basics!

The digi image set I used is apart of the current sale is a bundle pack- FIVE digis together for an outstanding price! Check it out here!


Copics: 
red sunflowers: R24, R46, E18, E19
yellow sunflowers: Y06, Y15, Y38, YR23
orange-y sunflowers: Y13, Y15, Y17, YR04
vase: C1, C3, R17, R37, R89

Hop on over to the Passionate Paper Creations & Friends Facebook Group and join if you're not already a member!

Thanks for stopping by... Happy Saturday!

Thursday, September 15, 2016

Blossom Girls

Hello!

I'm back on the LDRS Creative blog today sharing my latest project! I had been dying to color these sweet Blossom Girls since I first got them back in July and finally got the chance to now... BUT I couldn't decide on which one to use first, so what did I do???

I used all FOUR of course!!

Blossom Girls box 1

Blossom Girls box 2

I remembered having the template for this trapezoid box waaay back when- from an old Paper Crafts magazine.. dug it out and with some trial & error remembered how to make it again!

I colored each of the girls in their own style, but kept a similar color scheme overall... Each girl is also mounted with foam tape on top of a Stitched Flag die cut from Creative Basics. I also added a sentiment below each girl from this Amazing Girls sentiment set. And finally, added a thin wavy border (from this die cut) along with some lacy trim to finish off the top.

Here's a close up of each of the girls, along with the copic colors I used for each...

Jasmine:
Jasmine

skin: E000, E00, E11, R01, R22; hair: C3, 100; eyes, E35; clothes: BG11, BG13, BG15, Y06, Y15, Y38, W3, W5; purse: RV14, RV17, RV19, W3, W5

Blossom:
Blossom

skin: E00, E93, V12, R22; hair: E35, E37, E39, E29; eyes: E23; clothes: RV14, RV17, RV19

Daphne:
Daphne


skin: E000, E00, E21, R20, R22; hair: E25, E27, E29, YR23; eyes G21, G24; clothes: BG11, BG13, Y06, Y15, Y38, YR23, W3, W5; flowers: C0, C1, Y06, Y15.

Daisy:
Daisy

skin: E11, E33, E51, R22; hair: E44, E47, N9, YR23; eyes: B01, B05; clothes: BG10, BG11, BG13, BG15, RV14, RV17, RV19; Y06, Y15.

Thanks for stopping by!